How To Set Up Cisco SG350 Series Switches for Logitek Audio over IP
Before You Begin
- Ensure that you have a Cisco SG350-series switch. This article only applies to Cisco SG350-series switches.
- Decide how IP Addresses will be managed. We strongly recommend using DHCP to assign addresses to your networked audio devices, especially if Dante is involved in your system. Much of Dante is built around DHCP automatically assigning IP addresses. The SG-350 has a DHCP server built in, which you can enable to
- Update your switch to the latest firmware available from Cisco.
- By default, every port is set to VLAN 1. For most installations, you can do everything in this VLAN, but if you have a more elaborate network you can adapt these instructions to whichever VLAN handles your audio.
Configuring a Cisco SG350-series Switch for Logitek AoIP
The default IP address of a Cisco SG350-series switch out of the box will be 192.168.1.254. Set your computer to an address in this subnet and log into the switch with a web browser. The default username and password is cisco. You should change this to something more secure before proceeding.
Set Administrative Address
The first step is to set the administrative address of the switch, unless you will be running your audio network in the default 192.168.1.x subnet.Under the Administration menu, select Management Interface > IPv4 Interface. Click the Add button, and set an IP address within your Network Audio subnet, set the correct Subnet Mask (Network Mask). Click Apply. The warning will ask if you want to replace the existing IP Address, click OK. Apply changes and reconnect to the switch if needed.
If you are setting up a DHCP Server on the SG350, continue with the following steps so the switch can hand out IP addresses to your Logitek and/or Dante equipment. If you already have a DHCP server on your network or if you are using static IP addresses, skip ahead and continue where we disable the power saving (Green Ethernet) functions.
Select Advanced Configuration Mode from the upper right corner of the screen.
Select Advanced Configuration Mode from the upper right corner of the screen.
Go to IP Configuration, then expand IPv4 Management and Interface and DHCP Server, then select Network Pools.
Click Add.
In the window that pops up, enter the following:
In the Pool Name, enter a label that describes what this is. In our case, we used AoIP.
For Mask, enter the subnet mask. In our system, we use 255.255.255.0.
Enter the start and end addresses of the pool; the first address and last address that the DHCP server will hand out. Pro tip: leave some addresses available in the subnet for static devices, including the administrative address of the switch!
Click Apply.
Now, go to the Properties menu under DHCP Server and check Enable. Click Apply.
Disable Power Saving (Green Ethernet)
Now we need to disable the power saving functions of the switch to prevent it from interfering with our audio.
Under the Port Management menu, select Green Ethernet > Properties. Ensure Energy Detect Mode and 3 Energy Efficient Ethernet is disabled. Verify that all ports show 802.3 as Disabled under the Operational column. Click Apply.
If you haven't enabled it already, select Advanced Configuration Mode in the upper right corner of the screen.
Under the Multicast menu, select Properties. Enable Bridge Multicast Filtering. For each VLAN, select IP Group Address" as the Forwarding Method. Click Apply.
Set Up IGMP Snooping and the IGMP Querier
Under the Multicast menu, select IPv4 Multicast Configuration > IGMP Snooping menu and enable Snooping. Click Apply.
While on that page, click to select the VLAN(s), then click Edit. You will see the following pop up where you will set the following items:
- Check Enable for Snooping Status & Querier Status.
- Set Query Interval to 30 seconds.
- Select IGMPv2 as the Querier version.
- Select Auto for Querier Source IP Address. Click Apply.
Under the Multicast menu, select IPv4 Multicast Configuration > IGMP VLAN Settings. Select each VLAN that you are using and click Edit. Make the following settings for each VLAN being used for audio:
Set Query Robustness to 2
Set Query Interval to 30
Set Query Max Response Interval to 10
Set Last Member Query Interval to 1000
Set Multicast TTL Threshold to 0
Set Query Interval to 30
Set Query Max Response Interval to 10
Set Last Member Query Interval to 1000
Set Multicast TTL Threshold to 0
Set Up Multicast Routing
Under the Multicast menu, select Multicast Router Port and set all ports to None. This will cause the switch to Auto-Detect a Multicast Router Port if needed. Click Apply if needed.
Under the Multicast menu, select Forward and set all ports to None. This will prevent multicast from Flooding all ports. Click Apply if needed.
Under the Multicast menu, select Unregistered Multicast and set all ports connected to AoIP equipment and your Dante Controller PC (if applicable) to Forward. Failure to do this may cause Dante Controller and some AES-67 equipment to not discover any devices. Click Apply if needed.
Set Up Quality of Service
Under the Quality of Service, menu, select QoS Properties. Set mode to Basic. Click Apply if necessary.
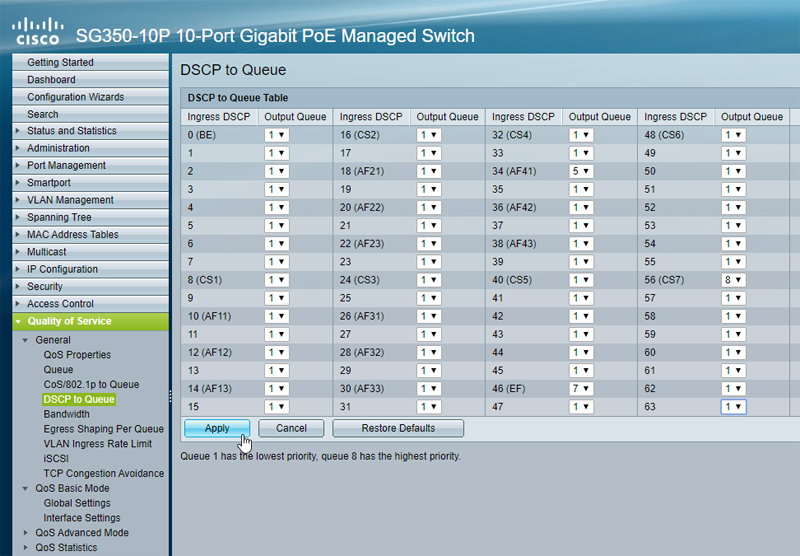
Under the Quality of Service, menu, select DSCP to Queue. Set Trust Mode to DSCP.
Now, go to Quality of Service/DSCP to Queue. Configure the table to look like the screenshot below with DSCP 56 set to Queue 8, DSCP46 set to Queue 7, DSCP34 set to Queue 5, and all other DSCP values set to Queue 1. PRO TIP: Tab between each field and use the number keys to set the values, it is much quicker than using the mouse. Click Apply.
Save Your Work
The switch is now configured. Click the blinking Save at the top of the screen to save the settings (or save under Administration/File Options). Also, under Administration/File Options, take a backup.
Related Articles
How To Set Up Cisco Catalyst 2960 for Logitek AoIP
OverviewLogitek uses multicast audio packets to stream audio between devices. These packets require a switch with IGMP Snooping and an IGMP Querier for proper management. You must set up these features in order for the switch to properly take care of ...Choosing An IP Address Scheme for Logitek AoIP
Set up a private IP address range that doesn't conflict with other subnets in your network, and keep your Audio over IP devices in that range. We don't have a preference, just pick something that works for your facility. Not to get too deep in the ...Recommended Ethernet Switches for AoIP
Generally speaking, any Gigabit switch will work for Dante, and any Gigabit switch that supports IGMP Snooping and an IGMP Querier will work for multicast (AES-67). We have begun to recommend the Cisco SG350 series of switches. They're managed ...How To Set Up HP ProCurve 2920 for Logitek AoIP
OverviewIt is critical that you enable IGMP Snooping and the IGMP Querier on your Ethernet switch for audio networking. These switch features properly manage the multicast audio packets that flow between devices. Without these features being turned ...How To Set Up Dante On The JetStream Plus
General Notes Connect Audio Net 1 on the JSP-DSP card to the Dante Network The default out of the box is that the Dante networking module is expecting to be issued an IP address by a DHCP server. All Dante devices need to be on the same subnet. If ...