JET67 Configuration Manual for use with Logitek Helix Radio Console
Welcome
Acknowledgements/Legal
Logitek Electronic Systems, Inc.
5622 Edgemoor Dr.
Houston, TX 77081
United States of America
Tel (713) 664-4470
Web logitekaudio.com
Email support@logitekaudio.com
Copyright © 2021 Logitek Electronic Systems, Inc.
Notice
Every effort has been made to supply complete and accurate information. However, Logitek Electronic Systems, Inc. assumes no responsibility for its use, nor any infringement of patents or other rights of third parties, which would result.
This product contains Livewire and Livewire+ technologies used under license from TLS Corp. TLS Corp patent information is available at https://telosalliance.com/legal
This product contains Ravenna technologies used under license from ALC NetworX GmbH.
Dante is a trademark of Audinate Pty Ltd and its technologies are used under license. Audinate patent information is available at https://www.audinate.com/legal/patents-and-trademarks
Worldwide rights reserved. Except for your own personal use, no part of this publication may be stored in a retrieval system, transmitted or reproduced in any way, including but not limited to photocopy, photograph, magnetic or other record, without the prior agreement and written permission of Logitek Electronic Systems, Inc.
Logitek is a trademark of Logitek Electronic Systems, Inc.
All other trademarks acknowledged.
System Requirements
- JetStream Server software for JET67
- A Windows 10 computer with Chrome or Edge. Firefox is not recommended.

Where to obtain JetStream Server for JET67
How To Install JetStream Server for JET67
- Create a folder on your PC called C:\Logitek
- Extract the contents of the zip file to C:\Logitek
- The executable file you will need to run is called Jet67Server.exe
Power Connections
Mains
Redundant Power Connection
Connect Your PC to the JET67
Logitek IP Addressing Standards

- The default address of the switch is 192.168.67.254
- A DHCP server has been configured on the switch with an address pool of 192.168.67.1 - 192.168.67.199.
- The default address of the JET67 will be set to 192.168.67.200. (If you have purchased more than one JET67, the default address will be written on a sticker on the unit.)
- You will be able to connect the JET67 and the computer you will use to configure it to the switch. As long as your computer is set to receive an address automatically (via DHCP), your computer will automatically be in the correct subnet to configure the equipment.
- Plug your computer into any network port on the back of the JET67
- Set your computer to a static address in the 192.168.67.x subnet
- The default address of the JET67 will be set to 192.168.67.200. If you have purchased more than one JET67, the default address will be written on a sticker on the unit.)
- If you are planning to use Dante, remember that everything must be in the same subnet, so either set up a DHCP server on the network or set everything up with static addresses in the same subnet. We suggest DHCP, as Dante cards can sometimes fight you when you try to set things to static. In our experience, Dante is much easier to use when you're running DHCP.
Ethernet Connections

Start JetStream Server and connect to the JET67
Programming The JET67
How To Add A Microphone Input
How To Set Up Mic Muting
How To Set Up Analog Inputs
How To Set Up Digital Inputs
How To Assign Sources To Console Faders
How To Add Analog and Digital Outputs
- Do a Default Reset. Click Defaults in JetStream Server and then Click Refresh in JetStream Server. This is very disruptive, as every route on the engine will go back to default and you will probably interrupt audio.
- Change the route manually on the JetStream State page in JetStream Server. Make a note of the output address on the web page when you edit it and then scroll to that address in the JetStream State page and change the route. This video shows you how.
How To Add Network Outputs


Managing Network Inputs
Using JetStream Server To Change Routes
Front Panel
Indicator Lights
No-Load Reset Button
This is a small black button to the right of the power LED. This button is used to perform a "no-load" reset to recover from a malformed configuration file. Here is what to do:
1. Unplug the power
2. Hold down the reset button
3. While holding the button, plug the power in. You will see a blinking red DSP light. Let go of the reset button.
4. Use JetStream Server to load a known good config file
System Resets
The following resets may be done from the JetStream Log page in JetStream Server:
-
Refresh - tells the system to re-reroute everything in memory. Does not interrupt audio. Does not return routes to their default.
-
Hardware Reset - Resets the system hardware. Use this reset if the engine locks up (squealing sound) or if there is no audio. It's the equivalent of pulling the power and rebooting. Will briefly interrupt audio and cause a popping sound when the analog cards reboot
-
Defaults - return all routes to their default. Click Refresh after performing Default reset to update surface labels.
Synchronization
Systems Without a Dante Card
The default sync is PTP v2. The JET67 will find its sync on the network automatically and the units on the network will select which machine is leader without user intervention. If the JET67 is being operated standalone and there are no PTP clocks on the network, it will use its own internal clock. When the JET67 powers up or performs a hardware reset, the system will pass audio within 2 seconds of boot.
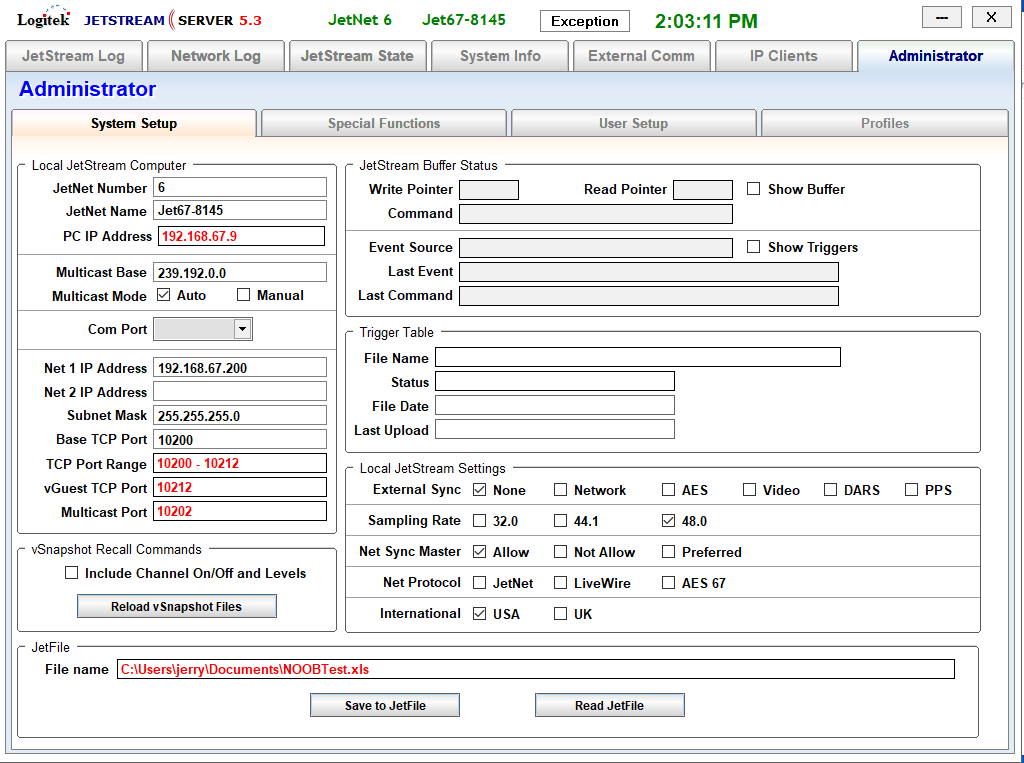
In JetStream Server, on the Administration page, you will see that the sync is set to "none." Leave this setting as-is; it will default to its internal crystal first and then automatically align its internal sync to PTPv2.
Dante Systems Only
The JET67 must use the PTP clock from the local Dante card. The Dante devices will elect their clock leader without user intervention. Having the JET67 lock to the Dante card will prevent unwanted clicks or distortion from Dante audio sources.
- When the JET67 powers up or when it performs a hardware reset, it will take up to 10 seconds to pass any audio because the Dante card must boot up first.
- We will set the JET67 up to sync to the Dante card at the factory. The following settings in JetStream Server on the Administration page must not be changed, as this is what will tell the engine to take its clocking from the Dante card:
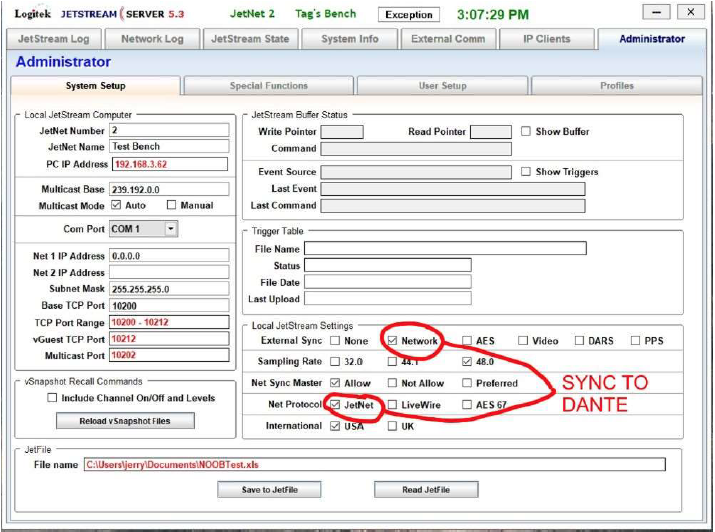
- If you upload a new XLS file into an engine with a Dante card, make sure these settings are in place to prevent unwanted clicks and distortion on network sources.
Using Virtual Soundcards
Livewire/Livewire+
Dante Virtual Soundcard
Wiring
Audio Connections
| + | – | Gnd | + | – |
| Dig | In 1 | Dig | In 2 |
| + | – | Gnd | + | – |
| Dig | Out 1 | Dig | Out 2 |
| + | – | Gnd | + | – |
| Mic | In 1 | Mic | In 2 |
| + | – | Gnd | + | – |
| Ana | In 1 | Ana | In 2 |
| + | – | Gnd | + | – |
| Ana | In 3 | Ana | In 4 |
| + | – | Gnd | + | – |
| Ana | In 5 | Ana | In 6 |
| + | – | Gnd | + | – |
| Ana | Out 1 | Ana | Out 2 |
| + | – | Gnd | + | – |
| Ana | Out 3 | Ana | Out 4 |
| + | – | Gnd | + | – |
| Ana | Out 5 | Ana | Out 6 |
| + | – | Gnd | + | – |
| Ana | Out 7 | Ana | Out 8 |
| + | – | Gnd | + | – |
| Mic | In 3 | Mic | In 4 |
| + | – | Gnd | + | – |
| Ana | Out 9 | Ana | Out 10 |
| + | – | Gnd | + | – |
| Ana | Out 11 | Ana | Out 12 |
| + | – | Gnd | + | – |
| Ana | Out 13 | Ana | Out 14 |
| + | – | Gnd | + | – |
| Ana | Out 15 | Ana | Out 16 |
GPIO
DB-15 Connector (female jack mounted on chassis)
- Out-1 9. +3.3 VDC
- Out-2 10. Out-7
- Out-3 11. In-1
- Out-4 12. In-2
- Out-5 13. In-3
- Out-6 14. In-4
- Out-Common 15. Out-8
- Ground
Inputs grounded to activate. The maximum input is 12 volts. The outputs are opto-isolated electronic relays. The maximum load is .5 amps at 50 volts.
Connect The JET67 to the Helix Console
Related Articles
Logitek JET67 and mixIT Radio Console Configuration and Operation Manual
Welcome Thank you for purchasing a Logitek Networked Console System. Logitek has offered Continuous Innovation Since 1979, and the JET67 continues that tradition with AES-67 networking, Livewire+ and Ravenna compatibility, and optional Dante ...Helix Console Manual
The Helix Console Manual is attached below.Pilot Console Manual
The Pilot Console Manual is attached below.Remora Console Manual
The Remora Console Manual is attached below.mixIT Console for JetStream manual
Click here to read the mixIT Console for JetStream Manual.